Saturday, November 27, 2010

OBIEE 11g, Opening Ports on Oracle Linux - How-To Video

Working with OBIEE 11g on Oracle Enterprise Linux (OEL), with or without the Unbreakable Kernel, one will need to open up several trusted ports as the firewall is turned on by default. Clearly, the best practice is too keep the firewall in-tact and enabled but for extra ports that are needed to access the OBI server environment. Configuring such access is straightforward. The video below takes an informal look at accomplishing opening ports using the OEL graphical user interface. This approach is great for a development or test environment but it is not recommended for a production environment.


The OBI 11g ports that are essential to open are:
  • 9704 - Presentation Services
  • 9703 - BI Server (Administration tool DSN access)
  • 7001 - WebLogic Server (Administration Console)

This video is part of a series of video blog posts on installing and configuring OBIEE 11g.

Friday, November 26, 2010

OBIEE 11g, Setup Client DSN for Administration Tool - How-To Video

After installing the OBI 11g client tools each OBI developer or administrator will need to access the Oracle BI RPD using the OBI Administration Tool. The Administration Tool is the GUI that connects to the Oracle BI Server RPD in Online mode (or on the network in offline mode) allowing development and administration functionality of the RPD. The informal video below highlights the process in which to create an ODBC data source connection to the Oracle BI server and test that the connectivity is working.


This video how-to makes the assumption that the client workstation already has the OBI 11g binaries installed on the machine from any of the install options via the OBI11g installer.

This video is part of a series of videos on OBI 11g installation and configuration.

Tuesday, November 23, 2010

OBIEE 11g Certification Available

Oracle tends to work hard to ensure that best practices are adhered to when working with their products. They even go as far to offer certifications which acknowledge one's ability to demonstrate product knowledge and acuity for implementing, developing, etc. with Oracle products. The release of OBIEE 11g is no exception, and Oracle has recently released the OBI 11g Certification Exam for those so inclined and ready to be stamped as an OBI 11g guru.

This certification holds some similar exam topics to that of its predecessor certification exam for the 10.1.3.x OBI version. But clearly with OBI 11g there are many new areas on which to be tested. Reading over the OBI 11g Exam certification topics one can get a good feel for what Oracle thinks are "must have" areas within the new application to focus on. Even if not taking the exam, learning these topics should provide an administrator, developer, or super-user with keen insight to working with and implementing OBI 11g.

The OB 11g Oracle certification is currently only available for Oracle partners. However, whether you gearing up for the OBI 11g exam or just needing to get educated on OBI 11g, BI Consulting Group has already released several OBI 11g training courses via their BICG University education center on the following topics:

# OBIEE 11-301: Dashboard/Report Application Development
# OBIEE 11-401: Repository/Metadata App Dev
# OBIEE 11-402: Server Architecture

In conclusion, I have always been a fan of official certifications as they show that one took the initiative to learn the information, was grilled on that information via examination, and knew the material well enough to achieve certification status. To me, this is only one or two steps below taking the time to write a book on the topic in question - guru status.

Do you think Oracle certifications are worthwhile?
How has an Oracle certification the helped you in the past?
Should Oracle offer a public OBI 11g certification?

Monday, November 22, 2010

Easy Download Link

When setting up a navigation from a report on a dashboard to a target report (not on a dashboard), one of the pieces missing and most asked for is a download link. To provide it, follow these simple steps.

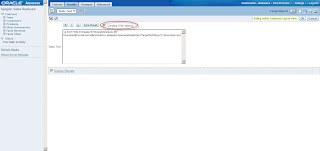
1. Open the report that should contain the download link
2. Add a static text view to the compound view

3. Check the "Contains HTML Markup" checkbox
4. Type:


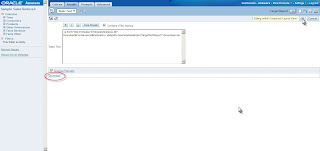
5. Click the "Display Results" link to verify it is working then click ok
6. Test it

Syntax:
http://virtualxp:9704/analytics/saw.dll? - the path to the BI Server (typically /analytics/saw.dll is all that is needed)
Download - the action to perform (other actions include Go and Navigate, not covered in this post, maybe next time)
&Format=excel - the format of the download
&Extension=.xls - the extension of the file (the report name will be the file name)
path=/users/administrator/Target%20Report - the path to the report

The path to the report can be found in the address bar.
If you are manually typing it in or providing it through a column value, don't forget to replace spaces, quotes, and other special characters with their HTML equivalents.

Other valid formats and extensions:
CSV - &Format=txt&Extension=.csv
PPT - &Format=powerpoint
Excel 2000 - &Format=excel2000&Extension=.xls
HTML - &Format=mht

Friday, November 19, 2010

An OBI 11g Client Tools Only Install Work-Around

OBI 11g has been out for several months now and it is getting great reviews - As it should! It is a clean and powerful upgrade from its 10g predecessor. With that being said, many things have changed, not only from a graphical end-user perspective but from a foundation and architecture one as well. This post is specifically discussing the later. Even more specifically, this post touches on what is probably the loudest complaint of System Integrators thus far which is that OBI 11g does not have a client tools install like OBI 10g did. What does this mean OBI 11g integrators and developers? It means that basically anytime one needs to leverage the Administration Tool, Catalog Manager, etc. on a client workstation (away from the OBI Server, i.e.: client/server interaction) the workstation must be loaded with all binaries and configurations as if it was to be the OBI 11g server itself. Oracle's documentation goes on to say that after a full install (Simple or Enterprise) on a client workstation (Windows only, of course) that one must shutdown and disable all server related Windows Services. Clearly this is cumbersome to say the least just to get client tools loaded.

To workaround this one can conduct the OBI 11g installation on a certified client OS using the Software Only Install option. This option requires that a Fusion Middleware Home already be established. So, WebLogic 10.3.3 must be installed on the client machine prior to conducting the OBI 11g Software Only installation. You may download from here or from the Oracle e-delivery site.

If you attempt to conduct the software only install without prior installation of the WebLogic Server you will be confronted with the following error messages (INST-07407, INST-07247):


Once the WebLogic Server has been installed on the client OS, install OBI 11g using the Software Only option. The installation should complete without incident as only the binaries are installed on the client machine. Once the install completes, navigate to the administration tool executable now under the path <fmw_home>\Oracle_BI1\bifoundation\server\bin\admintool.exe.

Please note that the administration tool and all OBIEE 11g client tools are certified to run on a 32-bit OS only. Be warned that the client tools will install onto a 64-bit machine but Oracle currently will not support that version OS if something goes wrong. Please see this link for the current OBI 11g certification matrix, here (OBI 11g Release 1) or here for the full Full Fusion Middleware Certification Matrices. Take note that this is an OBI 11g Client Tools Only Install Work-Around and it is not-officially supported by Oracle But, it is much more efficient than the extra steps per the Oracle documentation.

References
https://support.oracle.com/CSP/main/article?cmd=show&type=NOT&id=1186342.1

Using DAC & Informatica to send proactive email alerts for OLTP or .CSV config file data issues that cause ORA-01452: cannot CREATE UNIQUE INDEX

It is possible that a DAC ETL load for an OBI Apps DW implementation can fail due to source system data or improperly maintained configuration files. As much as we hope that the business users and or the OLTP system itself remain error-free, this is not always the case especially when you take into account human errors (manual updates to key .csv config files) or OLTP data integrity issues (unstable source system, multiple external feeds to source system, improperly coded or outdated OLTP processes). Normally, if a DAC ETL load is scheduled to be nightly, the earliest notice will be sent by the DAC upon success/failure and no corrective action can be taken until the logs are traced and the business is notified to correct the OLTP or .csv file error(s) and the load most often needs to be restarted and the business will have lost that time.

To mitigate this risk, The DAC and Informatica can also be used to create a proactive email alert notification to allow the business or OLTP support team to correct any issues that may break the nightly ETL load. One common example of an avoidable OBI Apps ETL error is the notorious ORA-01452: cannot CREATE UNIQUE INDEX error. The DAC will issue a CREATE UNIQUE INDEX command to eliminate redundancies and ensure accuracies of the source system.

Step 1: Find the INTEGRATION_D ID that caused the UNIQUE INDEX ERROR via the following method replacing the W_XXX_D with the appropriate Target table from the error log

SELECT INTEGRATION_ID, DATASOURCE_NUM_ID, EFFECTIVE_FROM_DT, COUNT(*) FROM W_XXXX_D
GROUP BY INTEGRATION_ID, DATASOURCE_NUM_ID, EFFECTIVE_FROM_DT HAVING COUNT(*) > 1;

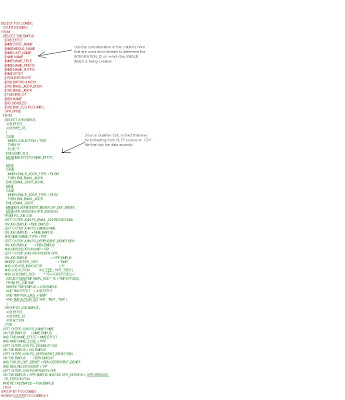
Step 2: Find the appropriate Source Qualifier extract SQL that is used for the mapping/mapplet that populates the target table (make sure to check for any SQ overrides at the session level). For example, the example below uses the SQ for the PeopleSoft mapplet C_mplt_BC_EmployeeDimension_Biography1. Use the same SQL concept as STEP1 to identify the exact records that are causing the downstream UNIQUE INDEX error by concatenating the fields that together may be used to create the INTEGRATION_ID downstream.


Using the above method should allow you to pinpoint the .CSV or the OLTP data anomaly that is causing the downstream Index Constraint.

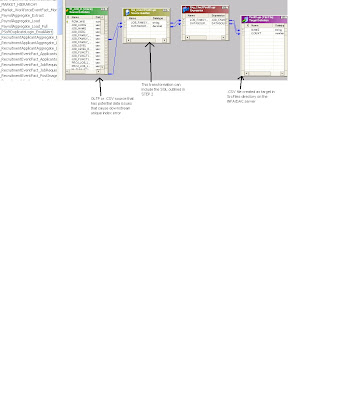
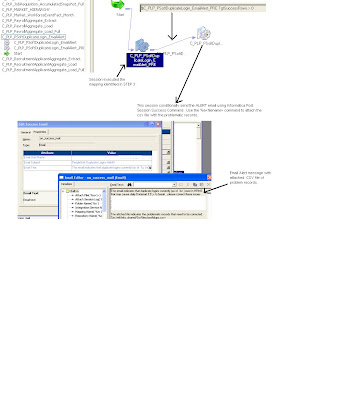
Step 3: Create a simple Informatica Mapping/Session that uses the above formulated query to query the datasource (.CSV or a set of OLTP tables) depending on the source of the data issue. As a target, its best to create a .csv file in the same SrcFiles directory that is already defined on the INFA/DAC server. The mappings should populate the .csv file.


Step 4:
Create a Session based on mapping in Step 3 that populates the .csv target with the problematic rows and conditionally sends an email to the appropriate business users or OLTP system admins with an attachment of the problem records.

Step 5
: Create the associated DAC components (tables, tasks, execution plan) etc and schedule this as a separate execution plan that is run at the same frequency of the actual Load. Preferably the alert should go to the correct business users who maintain the config file or the OLTP system contacts who can correct the source system issue detected.

The above approach can be useful for OBI Apps implementations that have issues related to source system data and/or config file errors. It will proactively notify the business to take corrective action on data anomalies that can cause Execution plan failures due to ORA UNIQUE INDEX error.


Wednesday, November 10, 2010

Cool New Feature in OBIEE 11g: Master-Detail Linking

A few weeks ago, I was fortunate enough to attend an OBIEE 11g workshop given by Oracle. There were so many cool, new features to be found in this new release of OBI, but one of them that seemed really slick was called Master-Detail Linking.

In a nutshell, you can create an analysis (report) with multiple different views and have the views dynamically change as you click on values from another view. Here’s an example of how to accomplish this:

1. Create a new Analysis and add some columns of interest:


2. View the results and add a pivot table view. Edit the pivot table by moving Region to Columns, and add a Grand Total to the Rows:

3. Now, my compound layout looks like this:

4. Go to the criteria tab, and select the properties of one of your dimensions. I’ll choose Year:

5. Go to the Interaction tab, and under Primary Interaction, select ‘Send Master-Detail Events’. Under Specify Channel, you must give it a name. It doesn’t matter what… just remember it for later. I like to use MD_ (for Master Detail) and then the column I’m using.

6. Go to the results tab, and add a vertical bar graph. Edit the graph by moving Year to Sections and check the ‘Display as Slider’ checkbox. To make my graph more interesting and easier to read, I’m going to move Line of Business down to ‘Vary by Color’.

7. Click on the graph properties icon:

8. On the General tab, check the box labeled ‘Listen to Master-Detail Events’. Be sure type in the Event Channel that you created earlier.

9. Back at the Compound Layout, click the preview icon:


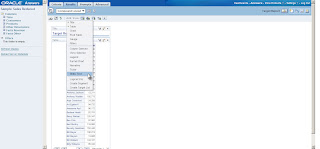
10. Click on the various years displayed in your pivot table. Your graph will dynamically refresh according to the year your clicked on the pivot table and a neat, animated fashion! Very cool!


11. Things to keep in mind: A map view can be the Master, but never the Detail. All other views can be either the Master or the Detail.
Tuesday, November 9, 2010

Dashboard Design Tips

When designing a set of dashboards, I like to include an “at-a-glance” or summary page as the first dashboard a user sees when they log on each day. This page should include a condensed version of the user’s key performance indicators as well as any generated alerts. Users should then have the option of drilling down or to additional detailed reporting. In order to encourage usage of the dashboards, embed your dashboards as a link within the corporate portal so users have one click access to the information

Consider the page placement of your key performing metrics based on web page eye movement. The diagram below shows how the human eye views a web page, based on level of priority. Place the most important elements for viewing in the upper left hand corner and the least important in the lower right corner to mimic the way the eye scans a page.

Some additional design guidelines are:

  • Ideally, the dashboard should fit on one page. Try to avoid any scrolling from left to right.
  • The best screen size for the dashboard window is 1024 x 768.

  • The ability to drill is critical to the success of your dashboards. Users need to know that the underlying data is going to be available to them. Some projects I’ve worked on have been very successful when allowing the users to drill not only to the detailed data but also back to the source transactional systems.
  • Introduce competition by using Top 10 reports, conditional formatting, etc.
  • Avoid decorative dashboard elements cluttering the screen like dials, gauges, excessive colors and images. Your dashboard can still be visually interesting while following standards.
  • Speaking of standards, it’s important that dashboard standards and best practices be defined early in the design process. This ensures consistency among various groups within your organization. I recently worked on a project where OBIEE had been in place for over a year, being used by a few departments. Additional teams were being brought on board and new development had already started. There were no design guidelines in place and the new dashboards were completely different among each of the teams. One of our exercises was to look at what was in production today and identify standards to be used in future development. This also caused a little rework on the production dashboards to meet the requirements of all teams, resulting in a consistent approach for the organization as a whole.

As a little bonus, I’ve included a few tips from Dashboard expert Stephen Few:

Characteristics of A Well-Designed Dashboard

  • Exceptionally Well Organized
  • Condensed, Primarily in the form or Summaries and Exceptions
  • Specific to and Customized for the Dashboard’s Audience and Objectives
  • Displayed Using Concise and Other Small Media that Communicates the Data and Its Messages in the Clearest and Most Direct Way Possible

Common Mistakes in Dashboard Design

  • Exceeding the Boundaries of a Single Screen
  • Supplying Inadequate Context for the Data
  • Displaying Excessive Detail or Precision
  • Arranging the Data Poorly
  • Highlighting Important Data Ineffectively or Not at All
  • Cluttering the Display with Useless Decoration
  • Misusing or Overusing Color
  • Designing an Unattractive Visual Display

Friday, November 5, 2010

Starting and Stopping BIEE from command line

BIEE11g uses now Weblogic as application server. This means we need to know some basic commands such as how to start and stop Weblogic server (WLS). In addition to this from the previous post we know that BIEE11g does not only require WLS but also other additional processes. All this plus the need to interact with these components by means of a script in a development / test environment led us to the conclusion that we need to know how we can start or stop BIEE (or even its processes) from a command line. So let us get in this:

Starting BIEE
:
  1. First, read and understand the BIEE11g architecture. This is discussed in a previous post (it can be found here).
  2. So now, you know we need to start / stop basically the Java and System components respectively:
    a. The Java Components:
    i. Admin Server
    ii. Managed Server
    b. System Components (OPMN Processes)
    i. BI Server
    ii. BI Presentation Services
    iii. BI Java Host
    iv. BI Cluster Controller
    v. BI Scheduler
Fortunately we do not need to create scripts for each of the components from scratch since during BIEE11g installation some of them were already created for us. We will make use of some of them: ( Note: In our examples our Fusion Middleware home is C:\fusionMW )

1. Start NodeManager:
This process starts automatically in Windows as a service (everytime the OS is restarted). Additional reference for this component can be found here

2. Start Admin Server:
Command: startWeblogic.cmd
Path: C:\fusionMW\user_projects\domains\bifoundation_domain\bin

You will be prompted for the admin user and password. You either enter these values everytime you start/stop the services or alternatively you can set these values in boot.properties file.

The WLS will have started when you see these messages:

OPTIONAL:
File Name:
boot.properties

Content:

username=
enter your user name here
password=enter your password here


For WLS place this file in:

C:\fusionMW\user_projects\domains\bifoundation_domain\servers\AdminServer\security

For Managed Server place this file in:

C:\fusionMW\user_projects\domains\bifoundation_domain\servers\bi_server1\security

The next time you restart WLS the password in the boot.properties will be encrypted.


3. Start Managed Server:
Instance: bi_server1
URL: http://hostname:7001
Command: startManagedWeblogic.cmd bi_server1 http://hostname:7001
Path: C:\fusionMW\user_projects\domains\bifoundation_domain\bin

The Managed Server will be up when you see the following lines:

4. Start All OPMN processes
Finally, you need to start all OPMN processes: BI Server, BI Presentation Services, BI Java Host, BI Cluster Controller, BI Scheduler.

Start OPMN services:
Command: opmnctl.cmd startall
Path: C:\fusionMW\instances\instance1\bin

Monitor Progress:
To monitor the progress of this task simply put the following command in a similar window (from the same directory):
Command: opmnctl.cmd status -l
Path: C:\fusionMW\instances\instance1\bin

Once all processes are "Alive" then you will get this screen:


Stopping BIEE
:
This process is almost the same but in reverse order. To stop all BIEE services you will have to perform the following commands in the respective order in the same directories where each of them started

1. Stop OPMN processes:
> opmnctl stopall

2. Stop Managed Server (bi_server1)
> stopManagedWeblogic.cmd bi_server1 t3://hostname:7001 username password

3. Stop WLS (Admin Server)
> stopWebLogic.sh username password t3://host.domain:7001

This is all you need to know about it to get started. If you already installed BIEE11g then you should be familiar with the Start/Stop BIEE services script that the installer produces. Well, that script uses a series of ANT commands to produce the same effect we have here described. In a future post I will explain about ANT and take such script as example.

Until next time