An Essbase cube may contain up to ten different alias tables so there's a lot of flexibility available. There are two ways to create alias tables:
- create an empty alias table and then populate the members manually
- import an alias table from a source file which contains the desired member names
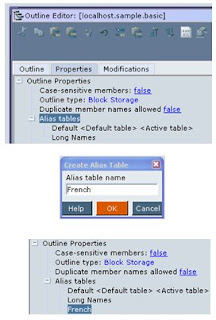
Here is an example of the manual process:

- Open the database outline
- Select the "Properties" tab
- Right-click on "Alias tables"
- Select "Create alias table . . ."
- Give alias table a name (ie "French" in this example)
- This will add the table "French" to the list of available alias tables
To populate the new alias table with members, follow these steps:
- Select a member. Right-click and select "Edit member properties . . ." and go to the "Information" tab
- Enter the new member alias name under "French" and press "OK". I chose to use "Cafeine Cola Libre" as the French name for "Caffeine Free Cola".
- When you're done entering names, save and close the outline
Note that Essbase Administration Services will show only the active alias table in the outline. You can change which is the active database alias table by going to the outline "Properties" tab (select a table, right-click and select "Set as active").
 I have created cubes with several foreign languages in different alias tables. Just remember that as new members get added, you must also have a way to include the correct aliases for all members.
 When users enter Excel, point them to the new alias table ("French" in this case) under the Essbase User Options so their retrievals will show the new member names.
If you're really ambitious, you can insert special member names into alias tables which you can use during Excel macro report creation. I will leave that topic for another day.

No comments:
Post a Comment