Have you ever made the mistake of forgetting your OC4J administrative password when installing OBIEE? It's happened to many of us and here is a great solution originally from David Kwan that can help you reset your password in a few minutes. I can't claim this as my own but have used this several times to help clients recover from any non-documented installs of OBIEE on their servers.
So here's the secret from Oracle Technical Support to reset it.
Please use following steps to reset your password:
1. Navigate to the <oc4j_root>/j2ee/home/config directory
2. Backup the file: system-jazn-data.xml for restore or later reference
3. Edit the file: system-jazn-data.xml
Locate the following entries:
<user>
<name>oc4jadmin</name>
<display-name>OC4J Administrator</display-name>
<description>OC4J Administrator</description>
<credentials>{903} MMGWnYKcnMKBBOR1LroHHrQpy3zmVbGEohN4aUSjxK4=</credentials>
</user>
and add the XML attribute deactivated="true", as shown below:
<user deactivated="true">
<name>oc4jadmin</name>
<display-name>OC4J Administrator</display-name>
<description>OC4J Administrator</description>
<credentials>{903} MMGWnYKcnMKBBOR1LroHHrQpy3zmVbGEohN4aUSjxK4=</credentials>
</user>
When you next start the oc4j instance using "oc4j -start" the container will re-prompt you for the password and add the newly encrypted password to the <credentials> tag in the oc4jadmin entry.
Monday, August 31, 2009

Thursday, August 27, 2009
OBIEE for Clinical Trial Management System (CTMS)
I just wanted to share my experience and thoughts about implementing an OBIEE Application on top of a Clinical Trial Management Application.
Oracle Siebel CRM Application has a model for Clinical Trial Management System, also known as CTMS targeted for biotechnology and pharmaceutical research and analysis. There is a potential demand for Analytics solution to address the needs of a Business Intelligence solution for the huge data cycles as a part of the clinical trials.
The legacy source of Business Intelligence reports for this data in most of the IT departments for this is through a legacy excel or an home grown application. Prepackaged OBIEE Applications does not have a module for Clinical Analytics and so there is a need to develop a complete custom OBI application in order to accomplish the requirements.
The challenge is to understand the business requirements and convert them to a data model.CTMS can be for Human Health or Animal Health divisions.
These implementations would need functional expert who understands the Siebel CRM CTMS application functionality end to end, CRM Data Model as well in which case a CRM application architect can explain any customizations done in data model design of the Siebel CRM Application. OBI architect needs to understand CRM data model and also the actual business process flow of a CTMS application.It is observed that usually there is a customization to an extent of 25% on the CRM application.
My experience as an OBIEE Architect for this kind of implementation was challenging and interesting. Requirements gathering sessions must be interactive with group of SME's, Team of members from business, project sponsors to mitigate any risk of
slipping the time lines. It is recommended to plan for regular client reviews and approvals of every build to avoid any gaps in the expectations by the client .
At a high level the reporting requirements may include tracking budget and finance, clinical trials, activities, investigators,Initiations, enrollments, expiration's, terminations. Cross dimensional hierarchies from Program to Protocol to Site to Subject is commonly desired.
Major dimension tables specific to CTMS includes Program, Protocol,Site,Subject, application, Investigator. Other common dimensions include Accounts, Contacts, Activities, Time, Geography,product, etc.
Here is a screen shot of a sample rpd for CTMS
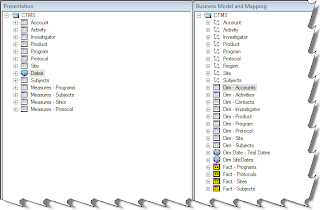
Oracle Siebel CRM Application has a model for Clinical Trial Management System, also known as CTMS targeted for biotechnology and pharmaceutical research and analysis. There is a potential demand for Analytics solution to address the needs of a Business Intelligence solution for the huge data cycles as a part of the clinical trials.
The legacy source of Business Intelligence reports for this data in most of the IT departments for this is through a legacy excel or an home grown application. Prepackaged OBIEE Applications does not have a module for Clinical Analytics and so there is a need to develop a complete custom OBI application in order to accomplish the requirements.
The challenge is to understand the business requirements and convert them to a data model.CTMS can be for Human Health or Animal Health divisions.
These implementations would need functional expert who understands the Siebel CRM CTMS application functionality end to end, CRM Data Model as well in which case a CRM application architect can explain any customizations done in data model design of the Siebel CRM Application. OBI architect needs to understand CRM data model and also the actual business process flow of a CTMS application.It is observed that usually there is a customization to an extent of 25% on the CRM application.
My experience as an OBIEE Architect for this kind of implementation was challenging and interesting. Requirements gathering sessions must be interactive with group of SME's, Team of members from business, project sponsors to mitigate any risk of
slipping the time lines. It is recommended to plan for regular client reviews and approvals of every build to avoid any gaps in the expectations by the client .
At a high level the reporting requirements may include tracking budget and finance, clinical trials, activities, investigators,Initiations, enrollments, expiration's, terminations. Cross dimensional hierarchies from Program to Protocol to Site to Subject is commonly desired.
Major dimension tables specific to CTMS includes Program, Protocol,Site,Subject, application, Investigator. Other common dimensions include Accounts, Contacts, Activities, Time, Geography,product, etc.
Here is a screen shot of a sample rpd for CTMS

Thursday, August 20, 2009
Creating and connecting "Work Repository" for ODI
This is in continuation to my earlier BLOG. We have created a Master Repository for ODI and ODI also needs a Work Repository which is a data structure that contains the data models, projects.
The following are the steps to create a Work Repository
1. Connect to the Master Repository that we created earlier.
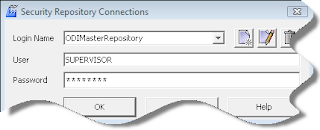
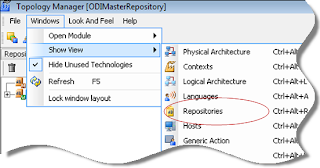
2. Open the Repositories View by clicking on Windows -> Show View -> Repositories
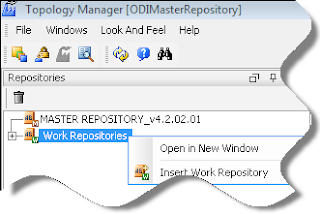
3. Right Click on Work Repositories and Click Insert Work Repository
4. In the connection window, complete the following parameters:
Name: Type the name for your work repository connection.Eg:ODIWorkRepository
Technology: Choose the technology of the server to host your work repository. I
have selected Oracle since my database is Oracle
User: User id of the owner of the tables you are going to create and host the work
repository.
Password: The above user's password.
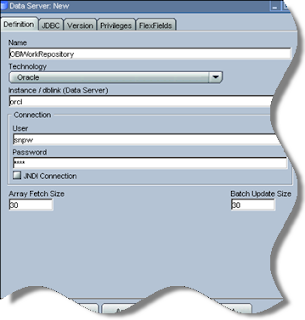
5. In the JDBC TAB provode the following details :
JDBC Driver: The driver required for the connection to the DBMS to host the work repository.
URL JDBC: The complete path of the data server to host the work
repository.
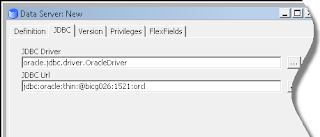
6. Click on Test. You must not click O.K without testing the connection
7. Now Click on OK to validate the parameters for connecting with the server to host our work repository. A window appears, asking you to give a unique name and user id code number to the repository.
8. In the window Work Repository, complete the following parameters:
ID: Give a unique number to your repository, from 1 to 998 included
Name: Give a unique name to your work repository eg: ODIWORKREPOSITORY
Type: Choose "Designer" in the list.
9. Validate by clicking on OK. The creation of the work repository begins and just
follow the different steps on the console
10. When the work repository has been created, the Work Repository window closes.
Connecting to Work Repository
The Work repository may be accessed through the modules Designer and Operator
1. In the Start Menu, select Programs > Oracle Data Integrator > Designer, or launch
the Designer script (bin/designer.bat or bin/designer.sh)
2. Click on the button New (first button to the right of the field Login name).
3. Complete the following values for Oracle Data Integrator Connection:
Login name: A generic alias Eg: ODIRepository)
User: SUPERVISOR (in capitals)
Password: SUNOPSIS (in capitals)
In the Database Connection(Master Repository)section, provide the following information:
User: User for the Master Repository
Password: This user's password.
List of drivers: The driver required to connect to the DBMS hosting the master
repository we have created now.
URL: The complete path for the data server hosting the master repository.
In the Work Repository section provide the following information:
Work repository name: The name of the work repository that we created. We can select the repository by clicking on the icon to the right side
4. Click on Test to check that the connection is working.
5. Click OK, OK. The module Designer opens
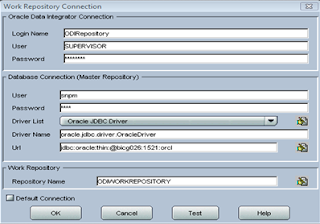
The following are the steps to create a Work Repository
1. Connect to the Master Repository that we created earlier.

2. Open the Repositories View by clicking on Windows -> Show View -> Repositories

3. Right Click on Work Repositories and Click Insert Work Repository

4. In the connection window, complete the following parameters:
Name: Type the name for your work repository connection.Eg:ODIWorkRepository
Technology: Choose the technology of the server to host your work repository. I
have selected Oracle since my database is Oracle
User: User id of the owner of the tables you are going to create and host the work
repository.
Password: The above user's password.

5. In the JDBC TAB provode the following details :
JDBC Driver: The driver required for the connection to the DBMS to host the work repository.
URL JDBC: The complete path of the data server to host the work
repository.

6. Click on Test. You must not click O.K without testing the connection
7. Now Click on OK to validate the parameters for connecting with the server to host our work repository. A window appears, asking you to give a unique name and user id code number to the repository.
8. In the window Work Repository, complete the following parameters:
ID: Give a unique number to your repository, from 1 to 998 included
Name: Give a unique name to your work repository eg: ODIWORKREPOSITORY
Type: Choose "Designer" in the list.
9. Validate by clicking on OK. The creation of the work repository begins and just
follow the different steps on the console
10. When the work repository has been created, the Work Repository window closes.
Connecting to Work Repository
The Work repository may be accessed through the modules Designer and Operator
1. In the Start Menu, select Programs > Oracle Data Integrator > Designer, or launch
the Designer script (bin/designer.bat or bin/designer.sh)
2. Click on the button New (first button to the right of the field Login name).
3. Complete the following values for Oracle Data Integrator Connection:
Login name: A generic alias Eg: ODIRepository)
User: SUPERVISOR (in capitals)
Password: SUNOPSIS (in capitals)
In the Database Connection(Master Repository)section, provide the following information:
User: User for the Master Repository
Password: This user's password.
List of drivers: The driver required to connect to the DBMS hosting the master
repository we have created now.
URL: The complete path for the data server hosting the master repository.
In the Work Repository section provide the following information:
Work repository name: The name of the work repository that we created. We can select the repository by clicking on the icon to the right side
4. Click on Test to check that the connection is working.
5. Click OK, OK. The module Designer opens

Wednesday, August 19, 2009
BICG Exhibiting at Oracle OpenWorld October 11-15, 2009
BI Consulting Group's booth can be found at Moscone South, booth number 2201. Stop by the BI Consulting Group booth to speak with management and learn about their professional services. During this year's event, BI Consulting Group will be hosting a happy hour event on the evening of Monday, October 12th. Details yet to be announced - looks to be a great time!
Monday, August 17, 2009
Connection Pools – Best Practices
Most of the times not much thought is given to defining connection pools while developing rpd. Improperly defined connection pool would affect the OBIEE performance and user experience. Here are some of the things to consider while defining connection pool.
· Change the default maximum connections. The default is 10. Based on your system usage change the value that is more realistic to your system usage
· Create a separate connection pool for execution of session variables
· Create a separate connection pool for the execution of aggregate persistence wizard. Remember that you need to give the schema user owner credentials for this connection pool as the wizard creates and drops tables
· If need be create a separate connection pool for VVIPs. You can control who gets to use the connection pool based on the connection pool permissions.
Friday, August 14, 2009
Creating and connecting ODI Modular Repositories
This is in continuation to my earlier BLOG "Installing ODI". In here I am summarizing details about ODI Modular Repositories and illustrating the steps needed for creating the ODI Repositories. These repositories must be created in order to use ODI engine.
The modular Repository for ODI is made up of a Master Repository and of one or several WorkRepositories. These repositories can be installed on any database engine that supports ANSIISO 89 syntax.
I have created these repositories on Oracle 11g Database
Creating Master Repository
1. Create a database user for Master Repository
For Example:
SQL>create user snpm identified by snpm
default tablespace system temporary tablespace temp;
SQL> grant connect, resource to snpm;
2. Click on repcreate.bat file under bin directory of ODI install root eg: C:\ODI\oracledi\bin and provide the following values and Test connect to make sure that the connection is successful, Select Technology as Oracle

3. It invokes Master Repository creation wizard window
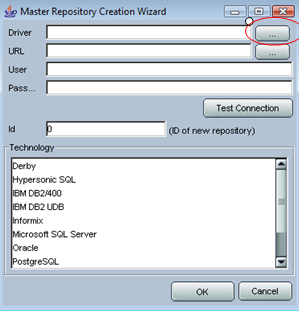
4. Click on the ellipsis button for Driver and select Oracle JDBG Driver from the dropdown list of names under Name
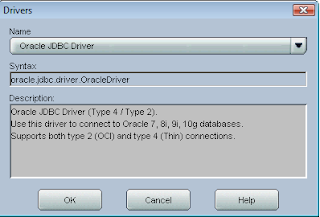
5. Update other parameters in the window like URL. The URL syntax can be got by clicking the ellipsis button for URL. After you get the sysntax update the values appropriately, provide values for user, password which are the values that you gave while creating the user for Master Repository. Change the ID default value, Select Technology as Oracle.(I have done this since my database is Oracle). Click Test Connection button for successfull connection and Click O.K
6. This brings up an Oracle Data Integrator Information window indicating successfull creation of the Master Repository. Click OK
Connect to the Master Repository
1. Launch Topology Manager from the Start Menu
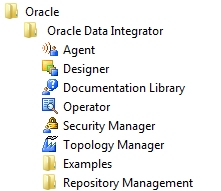
2. Click on New button and provide values for Login Name which may be any name, User: SUPERVISOR (use capitals), Password: SUNOPSIS (use capitals)
3. In the Database Connection (Master Repository) section provide values for the Master Repository username, Password, select your driver name from the Drivers List (I have selected Oracle JDBC Driver). Click on the hand icon to the right side of Driver Name to update this automatically, similarly Click on the hand icon to the right side of Url to update this automatically but you have to provide the values for these parameters.
4. Click Test to validate successfull connection
In the next Posting I will illustrate the steps for creating and connecting "Working Repository" for ODI
The modular Repository for ODI is made up of a Master Repository and of one or several WorkRepositories. These repositories can be installed on any database engine that supports ANSIISO 89 syntax.
I have created these repositories on Oracle 11g Database
Creating Master Repository
1. Create a database user for Master Repository
For Example:
SQL>create user snpm identified by snpm
default tablespace system temporary tablespace temp;
SQL> grant connect, resource to snpm;
2. Click on repcreate.bat file under bin directory of ODI install root eg: C:\ODI\oracledi\bin and provide the following values and Test connect to make sure that the connection is successful, Select Technology as Oracle

3. It invokes Master Repository creation wizard window

4. Click on the ellipsis button for Driver and select Oracle JDBG Driver from the dropdown list of names under Name

5. Update other parameters in the window like URL. The URL syntax can be got by clicking the ellipsis button for URL. After you get the sysntax update the values appropriately, provide values for user, password which are the values that you gave while creating the user for Master Repository. Change the ID default value, Select Technology as Oracle.(I have done this since my database is Oracle). Click Test Connection button for successfull connection and Click O.K
6. This brings up an Oracle Data Integrator Information window indicating successfull creation of the Master Repository. Click OK
Connect to the Master Repository
1. Launch Topology Manager from the Start Menu

2. Click on New button and provide values for Login Name which may be any name, User: SUPERVISOR (use capitals), Password: SUNOPSIS (use capitals)
3. In the Database Connection (Master Repository) section provide values for the Master Repository username, Password, select your driver name from the Drivers List (I have selected Oracle JDBC Driver). Click on the hand icon to the right side of Driver Name to update this automatically, similarly Click on the hand icon to the right side of Url to update this automatically but you have to provide the values for these parameters.
4. Click Test to validate successfull connection
In the next Posting I will illustrate the steps for creating and connecting "Working Repository" for ODI
OBIEE 10.1.3.4 Sample Application
In case you were not aware, the recently shipped 10.1.3.4 release of OBIEE includes a sample set of data, metadata, reports & dashboards that represent best practice for OBIEE metadata, report & dashboard development. There are some really good example reports and dashboards as well as solutions to common metadata modeling problems. It's well worth installing.

The sample files are also available stand alone on OTN for those not wishing to download the entire 10.1.3.4 distribution, and yes, they do work with previous 10g releases. Apparently the real trick is actually finding the file on OTN, so to save you the trouble here is a direct link: *LINKS UPDATED*
http://download.oracle.com/technology/products/bi/files/oracle_bi_sample_analysis_setup_files.zip
The documentation of best practices is contained in the following file:
http://download.oracle.com/technology/products/bi/files/oracle_bi_sample_app_content_guide.zip
Subscribe to:
Posts (Atom)